Building the Perfect Stage with Global Truss: A Guide to the 20x20x10 Feet F34 Circular Truss System

Emmanuel Josue

What’s up, event enthusiasts and stage setup pros! Welcome back to the Famous Stages blog, your go-to source for all things trussing and staging. Today, we’re diving into one of our favorite setups: the Global Truss 20x20x10 feet F34 Circular Truss System. Whether you're a DJ production manager, an event manager, or a trade show organizer, this truss system is a game-changer. Let’s get started on building this impressive setup!
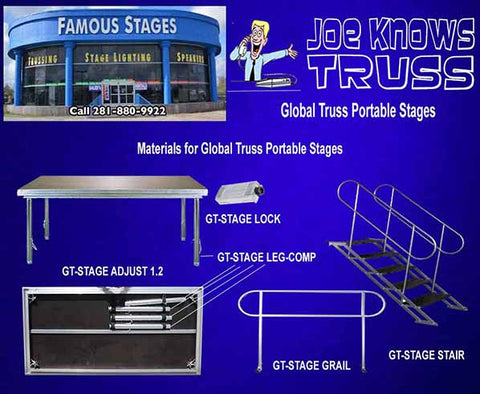
What You’ll Need:

Here’s a quick rundown of the Global Truss products we’ll be using:

  • 4 pcs. Global Truss SQ-4111 F34 12-inch Aluminum Box Truss (4.92 ft. long)
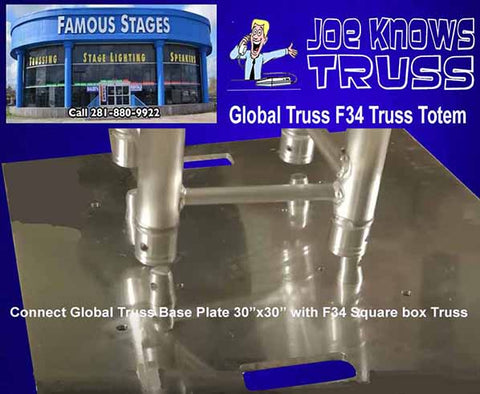
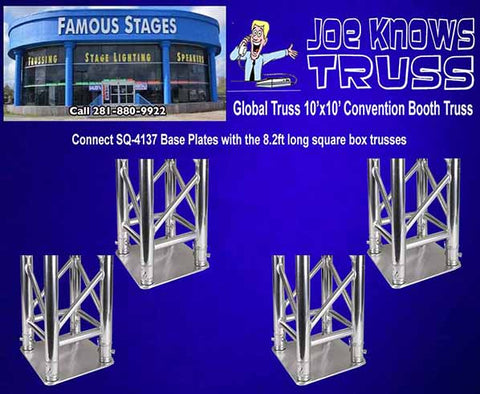
  • 4 pcs. SQ-4137 Base Plate 12x12-inch for F34 Square Truss
  • 4 pcs. Global Truss SQ-4113 F34 12-inch Aluminum Box Truss (8.2 ft. long)
  • 1 pcs. Global Truss ST-UJB-12 Universal Junction Box
  • 1 pcs. Global Truss F34 12-inch Truss 4Arc Circle (9.84 ft.)
  • 2 pcs. Global Truss UJB/C-12 1/2 Coupler with Alien Bolt (4 Pack)

Step-by-Step Assembly Guide

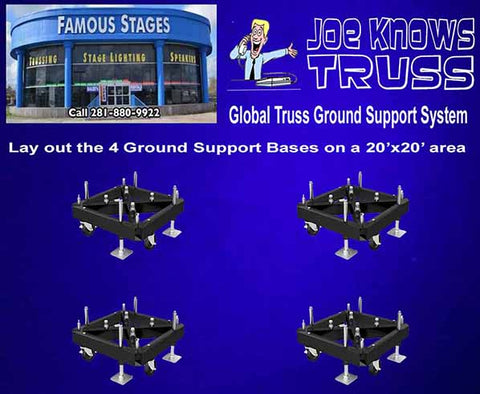
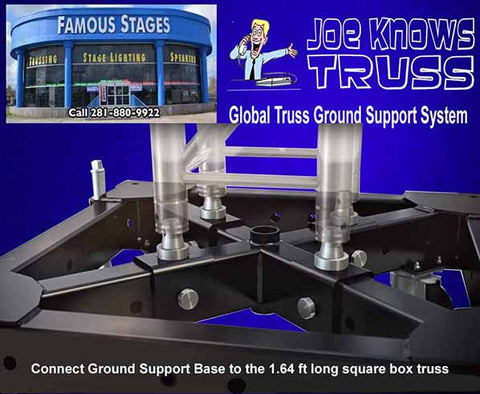
Step 1: Preparing the Base

First things first, let’s get the base ready. Place the four SQ-4137 base plates at the corners of your 20x20 feet stage area. Make sure they are evenly spaced and secure – these plates are the foundation of your entire setup.

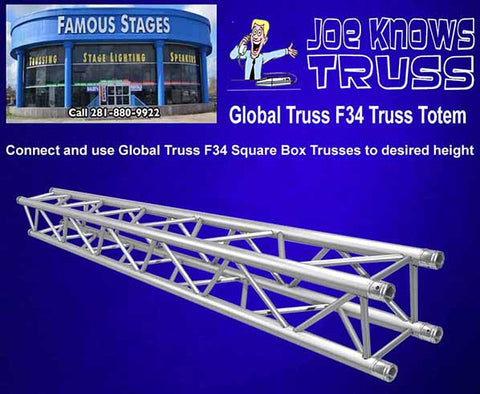
Step 2: Setting Up the Vertical Supports

Next, take the four SQ-4111 F34 Aluminum Box Trusses (4.92 ft. long) and attach them vertically to each base plate. These trusses will act as the pillars of your structure. Secure them tightly using the UJB/C-12 1/2 Couplers with Alien Bolts. It’s crucial to ensure these are solidly in place because they will support the entire weight of the truss system.

Setting Up Global Truss Base Plates and Vertical Supports


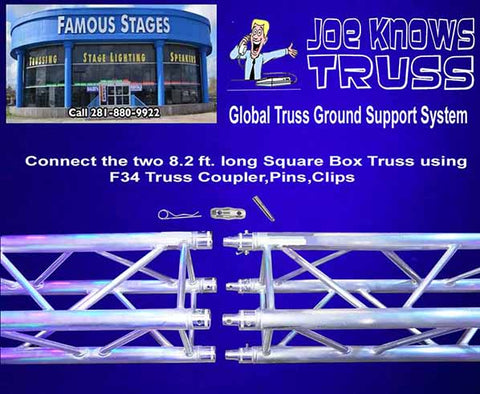
Step 3: Creating the Horizontal Framework

Now, it’s time to form the horizontal cross-section. Connect the four SQ-4113 F34 Aluminum Box Trusses (8.2 ft. long) to the tops of your vertical supports using the ST-UJB-12 Universal Junction Box in the center. This will create a cross-shaped framework at the top, which is the backbone of your stage design.

Step 4: Adding the Arc Trusses

This is where it gets exciting! Disassemble the Global Truss F34 4Arc Circle (9.84 ft.) into its four arc segments. Attach each arc to the ends of the horizontal trusses, creating four large arcs that extend out from the center. These arcs combined with the cross-shaped horizontal truss will provide a dome-shaped arc structure and add a dynamic visual element to your stage setup.

Cross-shaped horizontal trusses and Global Truss quarter arcs will provide a dome-shaped arc structure


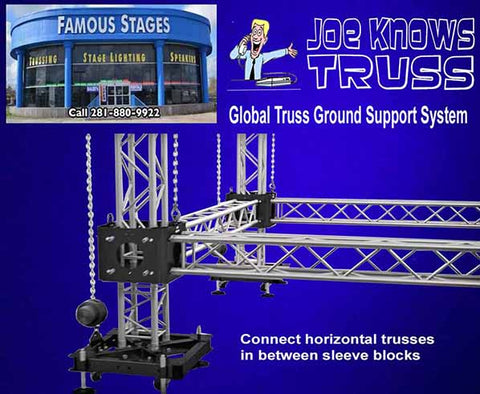
Step 5: Connecting the Arcs to the Vertical Posts

Now for the tricky part – aligning the top arc trusses with the vertical posts. Raise the horizontal framework carefully and align the other ends of the four arcs with the top ends of the vertical truss posts. Securely connect each arc to a vertical post using the UJB/C-12 1/2 Couplers with Alien Bolts. This step ensures that the arc trusses are firmly attached and stable.

Step 6: Securing the Structure

Finally, go around and double-check all connections. Use the remaining couplers to reinforce any weak spots, ensuring everything is rock-solid. Safety first, always!

Why Choose the Global Truss 20x20x10 Feet F34 Circular Truss System?

  • Versatility: This setup is perfect for a variety of events, from concerts and DJ sets to trade shows and conventions.
  • Sturdiness: Made from high-quality aluminum, these trusses are both lightweight and incredibly durable.
  • Aesthetic Appeal: The arc design adds a modern and professional touch to any event, enhancing the overall visual impact.

Final Thoughts

And there you have it! A step-by-step guide to building the Global Truss 20x20x10 feet F34 Circular Truss System. We hope this guide helps you create an amazing stage setup for your next event. If you have any questions or need further assistance, feel free to reach out to us at Famous Stages. Happy building, and may your events always be a resounding success!

Read more →

Creating Impactful Displays - Global Truss 20x20 Feet F34 12-Inch Truss Display Booth Circle

Emmanuel Josue

Hello there, event enthusiasts! Are you ready to kick your event setup up a notch and make jaws drop? Well, buckle up because we've got something seriously awesome to share with you – the Global Truss 20x20 feet F34 12-inch Truss Display Booth Circle. Trust us, this baby is about to become your event's new best friend!

What's in the Box:

  1. Sturdy Truss Segments: You'll get 4 of the Global Truss SQ-4111-1250 F34 12-Inch Aluminum Box Truss (4.10 foot long) to lay the groundwork for your display booth. They're like the foundation of a solid house – you gotta have 'em!
  2. Elevating Truss Segments: Picture this – 4 of the Global Truss SQ-4112-275 F34 12-Inch Aluminum Box Truss segments (9.02 foot long) that scream "look at me!" These babies are all about adding height and dimension to your setup.
  3. Centerpiece Circular Truss: Now, here's where the magic happens. This circular truss is like the crown jewel of your booth. It's unique, eye-catching, and guaranteed to turn heads. It's the Global Truss F34 12-Inch 4Arc Circle 9.84 ft.
  4. Handy Connection Pieces: We've included 8 of the Global Truss ST-UJB-12 Universal Junction Block and 4 packs of Global Truss ST-UJB/C-12 1/2 Coupler with Alien Bolt (4Pack) to make connecting everything a breeze. No complicated instructions here – just snap, click, and you're good to go!
  5. Stable Base Plates: You'll get 4 of the Global Truss SQ-4137 Base Plate 12x12-Inch for F34 Square Truss to keep your setup firmly grounded. Because let's face it, nobody wants a wobbly display booth!

How to Build Your Dream Booth:

Step 1: Lay the Groundwork Start by laying out the four Global Truss SQ-4137 Base Plates in a neat 20 x 20 feet square formation. Think of it as setting the stage for something amazing!

Step 2: Reach for the Sky Now it's time to get vertical! Grab those Global Truss SQ-4112-275 F34 12-Inch Aluminum Box Truss segments (9.02 foot long) and position one on each base plate. We're talking about creating some serious height here!

Connecting the Global Truss vertical truss segments, base plates and universal junction blocks.

Step 3: Connect the Dots Pop a Global Truss ST-UJB-12 Universal Junction Block on top of each vertical truss segment. These little guys are like the glue that holds everything together – literally!

Step 4: Bring on the Circle Using those extra junction blocks and couplers, connect the ends of the Global Truss F34 12-inch 4Arc Circle 9.84 ft to each Global Truss ST-UJB-12 Universal Junction Block. It's like connecting the dots to create a masterpiece!

Connecting the Global Truss F34 4Arc Circle with SQ-UJB-12 and horizontal trusses

Step 5: Attach the Horizontal Trusses Now, connect the Global Truss SQ-4111-1250 F34 12-Inch Aluminum Box Truss segments (4.10 foot long) to the junction blocks of the center circular truss structure. It's like adding the finishing touches to your masterpiece!

Step 6: Raise and Connect Gather at least four to five people and four step ladders. With teamwork and coordination, raise the horizontal trusses with the attached center circular truss structure to the Global Truss ST-UJB-12 Universal Junction Blocks on top of the vertical trusses, which are on the base plates. This step ties everything together, quite literally!

Step 7: Stand Back and Admire Once everything's in place, take a step back and soak it all in. You've just built yourself one heck of a display booth – and it looks incredible!

Step 8: Get Creative Now comes the fun part – adding your personal touch! Whether it's lights, banners, or signage, make it yours and make it shine!

Ready, Set, Showtime!

Congratulations, you've officially become the master of event setups! Now go out there and knock the socks off your audience – we know you've got this!

Read more →

Super Charge Your Event: Assembling a Global Truss 10x10 F34 Truss Archway

Emmanuel Josue

Hey there, event planners and production wizards! Ready to make your next event truly unforgettable? We're about to show you how to assemble a stunning 10x10 F34 truss archway using top-notch Global Truss components. Whether you're setting up for a trade show, concert, or a grand corporate event, this archway will add that professional flair and wow factor you're looking for. So, let's dive in and get building!

Your Truss Tool Kit:

For this project, we've got a fantastic selection of Global Truss products. Here's what you'll need:

  • 2 pcs. Global Truss 1x4 ft Base Plate for F24-F33-F34 Truss: These base plates are the sturdy foundation of your archway. Think of them as the bedrock that keeps everything standing tall and proud.
  • 1 pcs. Global Truss SQ-4110-75 F34 12-inch Aluminum Box Truss 2.46 ft. long: This short but mighty truss segment will top off your archway.
  • 2 pcs. Global Truss SQ-4112 F34 12-inch Aluminum Box Truss 6.56 ft. long: These longer truss segments are your vertical supports, forming the main pillars of your archway.
  • 4 pcs. Global Truss F34 12-inch 2-way 135-degree Corner 1.64 ft.: These corner pieces are the secret sauce for creating that sleek, curved top.

Global 
 Truss F34 Truss Archway Product List

Step-by-Step Guide to Building Your Archway:

Step 1: Lay the Groundwork with Base Plates

First things first, place those sturdy Global Truss 1x4 ft Base Plates on the ground where you want your archway. Make sure they're aligned and properly spaced apart to support the structure’s width. These plates are your archway's strong foundation.

Step 2: Raise the Vertical Trusses

Next, it’s time to go vertical. Attach the Global Truss SQ-4112 6.56 ft. long F34 Aluminum Box Truss segments to the base plates. These will be your archway's main pillars. Make sure they're securely fastened to the base plates, creating a stable, upright structure.

Step 3: Add the Elegant Curves

Now, let’s add some curves to our creation. Attach the Global Truss F34 12-inch 2-way 135-degree Corner pieces to the top of each vertical truss segment. These corners will start forming the beautiful arch at the top.

Step 4: Connect the Top Piece

Here comes the cherry on top! Connect the Global Truss SQ-4110-75 F34 2.46 ft. long Aluminum Box Truss segment horizontally between the two sets of corner pieces. This segment completes the arch, giving it that professional and elegant curve.

Step 5: Secure and Stabilize

Before we finish, double-check all connections. Ensure everything is tight and secure. Your archway should be standing firm and stable, ready to support any extra elements like lighting or signage.

Step 6: Mount Your Lighting

Now for the fun part—lighting! Stage trussing isn't complete without some spectacular lights. Attach stage lights, LED lighting, and moving heads to your archway. The Global Truss F34 system is perfect for mounting these elements securely. Evenly distribute the lights to create a balanced and visually appealing setup. Not only will this enhance the ambiance, but it will also draw attention to your booth or stage.

Step 7: Final Touches and Safety Check

We’re almost there! Conduct a thorough safety check to ensure everything is stable. Make any necessary adjustments to ensure the structure is safe and sturdy. You want your archway to impress, not collapse!

Conclusion: Your Show-Stopping Archway Awaits

And there you have it, folks! With just a few high-quality Global Truss components and a little elbow grease, you've built a 10x10 F34 truss archway that will make your event shine. Whether you're hosting a trade show, a concert, or a corporate event, this archway will help you stand out and make a lasting impression.

Remember, at Famous Stages, we're here to help you create unforgettable events with the best stage truss, stage trussing, and stage lighting truss systems. So go ahead, give your event the wow factor it deserves with Global Truss. Happy building!

Read more →

Spice up your Stage Trussing with Global Truss DJ TRIANGLE TRUSS-PACK Goal Post

Emmanuel Josue

Hey fellow stage aficionados and party enthusiasts! Are you ready to take your events from ordinary to extraordinary? Get ready to dive into the Global Truss DJ TRIANGLE TRUSS-PACK Goal Post – your ticket to transforming any venue into a stage sensation!

Let's Get Technical


First things first, let's break down the gear you've got in this powerhouse package:

Base Plates: These 2 rectangular triangle base plates are the rock-solid foundation of your stage setup, ensuring stability and reliability.

Vertical Posts: Picture this – you've got two vertical posts, each composed of two pieces of the Global Truss Triangle Truss straight segments provided in the package. That's right, double the strength to support your stage dreams!

Corner Trusses: Don't forget those 2 corner triangle truss sections that slide together to create an 8 feet span of truss! These 2 corner trusses complete the look, adding both style and stability to your setup.

Horizontal Trusses: Your horizontal trusses are also made of the trusty Global Truss Triangle Truss straight segments. These pieces connect your vertical posts and the corner trusses, forming the framework of your triangle stage truss goal post.                                                                          

Building Your Stage Kingdom

  1. Set Up the Base Plates: Position your base plates in the desired location, ensuring they're parallel and securely placed
  2. Connect the Vertical Posts: Take your vertical posts (each composed of two pieces of the Global Truss Triangle Truss straight segments) and secure them to the base plates. This forms the backbone of your goal post truss structure, doubling down on support. Connect Global Truss Triangle Truss straight segments
  3. Complete the Corners: Connect the 2 corner trusses to the top left and right corners of your structure. These pieces not only add visual flair but also provide additional reinforcement for your stage truss goal post masterpiece.Connect Global Truss Triangle Truss Corners
  4. Add the Horizontal Trusses: Now, it's time to connect those horizontal trusses (also made of the Global Truss Triangle Truss straight segments) to your vertical posts. This step solidifies the frame of your stage, creating the iconic goal post shape.
Let Your Gear Shine


With your truss structure in place, it's time to let your gear steal the spotlight. Hang your lights, mount your speakers, and bring your stage to life with the equipment that sets the mood and moves the crowd.

Fine-Tune and Rock On

Step back, take a deep breath, and admire your handiwork. But remember, we're not done just yet. Fire up your gear, test the lights, crank up the music, and make any necessary adjustments to ensure your stage setup is primed for an unforgettable performance.

Ready to Rock the Stage?

With the Global Truss DJ TRIANGLE TRUSS-PACK Goal Post, you've got the tools you need to take your events to new heights. So go ahead, unleash your creativity, and make every performance a showstopper.

Ready to elevate your stage game? Head over to famousstages.com and get your hands on the Global Truss DJ TRIANGLE TRUSS-PACK Goal Post today. Your audience won't know what hit them!

Read more →

Enhance Your Trade Show Presence: Assembling a Global Truss F34 Booth with Rounded Corners

Emmanuel Josue

Are you ready to steal the spotlight at your next trade show? Look no further than the Global Truss F34 system, your ticket to creating an impressive booth that captures attention and leaves a lasting impression. In this easy-to-follow guide, we'll walk you through assembling a 10'x10'x10’ U-shaped trade show booth using top-quality Global Truss components, perfect for industry leaders and companies looking to showcase their brand with style.

Introduction: Shine Bright with Global Truss F34 Stage Truss System

Trade shows are the perfect stage for industry leaders and companies to showcase their products and innovations. With the Global Truss F34 Stage Truss system, you can elevate your trade show presence and stand out from the competition. Let's dive into the step-by-step process of assembling your booth.

Materials:

We will use the following Global Truss products for this project:

  • 3 pcs. Global Truss SQ-4112 6.56 ft. long F34 Square Truss Segments: These versatile truss segments provide robust support for your booth structure, ensuring stability and durability throughout the event.
  • 4 pcs. Global Truss SQ-4113 8.2' ft. long F34 Square Truss Segments: Designed for maximum strength and flexibility, these truss segments serve as the vertical pillars of your booth, showcasing your brand with elegance and style.
  • 4 pcs. Global Truss SQ-4137 1' x 1' Base Plates: Lay the groundwork for your booth's stability with these sturdy base plates, engineered to withstand the demands of the trade show environment.
  • 2 pcs. Global Truss SQ-4126-CR-L90 90-deg. 3-Way Rounded Corners: Add a touch of sophistication to your booth's design with these sleek rounded corners, seamlessly blending style and functionality.
  • 2 pcs. Global Truss SQ-4121-CR-L90 90-deg. 2-Way Rounded Corners: Enhance the structural integrity of your booth while elevating its visual appeal with these stylish rounded corners, designed to impress both industry leaders and attendees alike.

With this carefully curated selection of Global Truss products, you can create a trade show booth that not only stands out but also reflects the professionalism and innovation of your brand. Let's dive into the step-by-step process of assembling your booth and making a lasting impression on your audience.

Step 1: Lay the Groundwork with Stable Base Plates

Start by securing the sturdy Global Truss SQ-4137 1'x1' Base Plates in your desired layout. These plates provide a solid foundation, ensuring your booth stands strong throughout the event, no matter how bustling it gets

Step 2: Build Up the Backbone for Stability

Assemble your vertical uprights using the reliable Global Truss SQ-4113 8.2' ft. long F34 Square Truss Segments. Attach them securely to each base plate to create the framework of your booth, guaranteeing stability even in the busiest environments.

Attach 4 Global Truss SQ-4137 base plates with the 4 SQ-4113 8.2 ft long Box Truss

Step 3: Add Flair with Rounded Corner Pieces

Now, let's add some flair with the sleek Global Truss SQ-4126-CR-L90 90-deg. 3-Way Rounded Corners at the back, and the stylish Global Truss SQ-4121-CR-L90 90-deg. 2-Way Rounded Corners at the front. These corner pieces not only enhance stability but also add a touch of sophistication to your booth's design.

Connecting Global Truss F34 Square Box Truss segments with Global Truss SQ-4126-CR-L90 90-deg. 3-Way Rounded Corners

Connecting Global Truss F34 Square Box Truss segments with Global Truss SQ-4121-CR-L90 90-deg. 2-Way Rounded Corners

Step 4: Connect Horizontal Truss Segments for Flexibility

Use the versatile Global Truss SQ-4112 6.56 ft. long F34 Square Truss Segments to connect the front and back uprights horizontally. These segments allow you to customize your booth's dimensions while providing sturdy support for lighting and other accessories.

Connecting the upper part of the trade Show Booth with rounded corners

Note: if you have  available Global Truss Crank Stands, you may connect the  Global Truss SQ-4112 6.56 ft. long F34 Square Truss Segments  with the front  Global Truss SQ-4121-CR-L90 90-deg. 2-Way Rounded Corners and the back Global Truss SQ-4126-CR-L90 90-deg. 3-Way Rounded Corners  to form the U-shaped upper part of the Convention Booth truss right on the ground. You can use about 3 cranks stands to lift the upper part and connect it to four vertical Global Truss SQ-4113 8.2' ft. long F34 Square Truss Segments with attached Global Truss SQ-4137 1'x1' Base Plates. Otherwise, you may need some helping hands (at least 2-3 people) and at least 2-4 step ladders to accomplish Step 1 to 4.

Step 5: Ensure Stability and Safety

Before moving forward, double-check the stability and safety of your booth structure. Confirm all connections are secure and stable, ensuring a safe environment for both attendees and staff throughout the event.

Step 6: Add Lighting and Accessories for Impact

With the main structure in place, it's time to enhance the visual appeal of your booth. Illuminate your products and branding with stage lighting truss and add any other accessories to showcase your offerings in the best light possible.

Step 7: Test and Get Ready to Wow

Conduct a final test to ensure everything is in working order and ready to impress. Shake the booth gently to simulate movement and make any final adjustments as needed. Now, get ready to wow industry leaders and companies with your stunning Global Truss booth!

Conclusion: Make Your Mark with Global Truss F34 Stage Truss System

Creating a standout trade show booth has never been easier with Global Truss F34. Follow these steps and use top-quality components to create a booth that not only grabs attention but also reflects the professionalism and innovation of your brand. Elevate your trade show presence with Global Truss F34 and make your mark in the industry!

Read more →

Elevate Your Stage Game: The Ultimate Guide to Global Truss Portable Stages

Emmanuel Josue

Introduction:

Hey there, fellow stage enthusiast! Ready to transform your stage dreams into reality? Buckle up because we're about to embark on a thrilling journey with FamousStages.com, your ultimate destination for stage production equipment, including the renowned Global Truss systems. In this detailed guide, we'll walk you through assembling a rock-solid, flexible stage using Global Truss components. Let's dive in and create a stage that'll have performers and audiences cheering for more!

Step 1: Gather Your Gear

First things first – let's ensure you have everything you need to kick off your stage-building adventure:

  • Global Truss GT-Stage Adjust Panels (around 15 panels of Global Truss GT-STAGE-ADJUST 1.2)
  • GT-STAIR for easy stage access
  • GT-GRAIL for safety and protection
  • Plus, essential extras like bolts, nuts, and safety pins

 Materials for Global Truss Portable Stages


Step 2: Let's Get Building!

Now, let's roll up those sleeves and start assembling your GT-Stage Adjust Panels:

  • Lay out your GT-Stage Adjust panel on a flat, clean surface.
  • Attach the GT-STAGE LEG - COMP units to each corner, ensuring stability with adjustable height settings.
  • Securely fasten the units in place for rock-solid stability.
  • Connect the panels using GT-Stage Locks for a secure fit, allowing various configurations for your stage.

 Global Truss GT-Stage Adjust front and bottom view


 Attach Global Truss GT-Stage Legs to GT-Stage Adjust Panels


Connect 2 Global Truss GT-Stage Adjust panels 

Step 3: Sprinkle on Some Extra Magic

Add a few extra goodies to enhance your stage setup:

  • Install the GT-STAIR for convenient access.
  • Incorporate the GT-GRAIL for perimeter protection.

Install Global Truss GT-Stage Stair 


Install Global Truss GT-Stage GRail 


Step 4: Finishing Touches

Perform a final inspection to ensure everything is secure and aligned, meeting safety standards.

Conclusion:

Congratulations! With FamousStages.com and Global Truss, you've crafted a versatile, top-quality stage. Elevate your next event with confidence, knowing you've got the best equipment and expert guidance. Let's make your stage dreams a reality!

Read more →

Constructing a Solid Foundation: A Guide to Assembling Global Truss Ground Support Systems - Multi-Tower Basement Structure

Emmanuel Josue

Introduction:

Welcome to FamousStages.com, your premier destination for top-quality stage production equipment, including Global Truss systems. In this guide, we'll walk you through the process of erecting a sturdy ground support system using Global Truss components. Whether you're preparing for a concert, corporate event, or any other production, mastering the assembly of the ground support structure is crucial for building a reliable stage trussing setup. Let's dive into the step-by-step process to ensure your multi-tower basement structure stands strong and secure.

Step 1: Preparing Your Equipment

Before beginning assembly, ensure you have all the necessary components from your Global Truss ground support system kit. This includes:

a. Four sets of Global Truss GT1804 - GROUND-SUPPORT-SYSTEM-18.04-ft

 One set includes:

  • 1 Ton Manual Chain Hoist (30 ft) or Electric Chain Hoist
  • Ground Support Base (44BS-1)
  • Four Outriggers with Stabilizer Arms (GT-492145-1)
  • Sleeve Block (GT-BLOCK)
  • Top for Chain Motor (GT-TOP/CM)
  • Two 5/8-inch Steel Shackles
  • 9 ft Round Sling with Aircraft Cable Inside (WIREROPE9)
  • Left and Right 88mm Hinges for Ground Support System (HINGE/M12-L/88MM, HINGE/M12-R/88MM)
  • 1 piece Global Truss F34 12-inch Aluminum Square Box Truss 1.64 ft. long
  • 2 pieces Global Truss F34 12-inch Aluminum Square Box Truss 8.2 ft. long

 This set will serve as base and vertical post of the ground support system tower.

b. Four sets of F34 square trusses for the horizontal trusses

One set includes:

  • 1 piece Global Truss F34 12-inch Aluminum Square Box Truss 1.64 ft. long
  • 2 pieces Global Truss F34 12-inch Aluminum Square Box Truss 9.2 ft. long


Step 2: Setting Up the Ground Support Structure

Begin by laying out the four ground support bases on the ground on a square-shaped area which is approximately 20’ x 20’. Note that the base casters are for transporting the base only. The wheels are not designed for movement under load or to carry the load of the tower. You use and adjust the Screw Jack to stabilize firmly the ground support structure.

Lay out the 4 Ground Support Bases


Connect the Ground Support Base (44BS-1) to the 1.64 ft long square box truss. Once connected, position the Sleeve Block (GT-BLOCK) on top of the Ground Support base with the 1.64 ft. long square box truss inside the Sleeve Block, emphasizing its importance in supporting the horizontal and vertical trusses.


Connect the Ground Support Base (44BS-1) to the 1.64 ft long square box truss.


Place the Global Truss Sleeve Bock on top of the Ground Support Base


Next, connect the two 8.2 ft square box trusses using truss couplers, pins and clips, then connect these trusses to the 1.64 ft long square box truss using the Left and Right 88mm Hinges (HINGE/M12-L/88MM, HINGE/M12-R/88MM). Ensure the connections are secure, as this forms the foundation for the vertical posts/tower. Also, connect the Top for Chain Motor (GT-TOP/CM) on one end of the vertical truss which will be the topmost part of the vertical post/tower.


Connect the 2 8.2 ft. Square Box Trusses


Connect the 2 vertical truss to the 1.64 ft. square box truss


Step 3: Erecting the Vertical Trusses

With the Ground Support Base, 1.64 ft long square truss and Sleeve Block in place, proceed to erect the vertical trusses of each ground support system set. Position them securely on top of the ground support bases, ensuring alignment and stability.


Erect the vertical trusses of each ground support system tower set


Step 4: Attaching Horizontal Trusses

After setting up the ground support structure, it's time to incorporate the horizontal trusses, crucial for structure’s stability and functionality. Begin by securely attaching the two 9.02 ft long square box trusses and the 1.64 ft long square box truss together, forming a robust horizontal assembly. Ensure a tight connection using reliable hardware, highlighting the durability of Global Truss stage trussing solutions.

Connect the horizontal trusses in between the Sleeve Blocks (GT-BLOCK) forming a square-shaped horizontal truss assembly.  


Connect the horizontal Global Truss Square Box Trusses in between the Global Truss Sleve Blocks


Utilize the manual Chain Hoist (CHAIN HOIST30) to raise the connected horizontal trusses towards the top of the vertical posts, underscoring the versatility of Global Truss systems in stage truss construction. You can also use an electric chain hoist in place of the manual one to raise the structure easier.


 Step 5: Adding Stabilization

Install the Outriggers with Stabilizer Arms (GT-492145-1) to each Ground Support Base, providing additional stability and support to the structure. Adjust the stabilizer arms as needed to ensure proper balance and alignment.

Step 6: Final Adjustments and Safety Checks

Before proceeding further, conduct thorough safety checks to ensure the stability and integrity of the ground support structure. Inspect all connections, hardware, and rigging for any signs of weakness or instability.

Make any necessary adjustments or reinforcements to address potential hazards and ensure the structure is safe for use.

Conclusion:

With the ground support structure assembled, you've laid a solid foundation for your stage setup using Global Truss components. In our next blog, we'll explore the assembly of stage components          within this structure, creating a complete stage platform for your event needs. Stay tuned to FamousStages.com for more expert guidance on stage production equipment and techniques.

Read more →

Step-by-Step Guide: Assembling a Global Truss F34 Square Box Truss Totem for Stage Lighting

Emmanuel Josue

Introduction:

Stage trussing stands as a cornerstone of event production and stage design, offering a sturdy framework for lighting fixtures and equipment. Paired with a Global Truss 30"x30" base plate, the Global Truss F34 Square Box Truss provides unparalleled stability and adaptability, ideal for creating captivating stage setups. In this comprehensive guide, we'll walk you through assembling a Global Truss F34 Square Box Truss Totem, ensuring both structural integrity and visual excellence.

Gather Your Materials:

Begin by gathering all the necessary components for the truss totem assembly, including Global Truss F34 square box truss segments, a Global Truss 30"x30" base plate, F34 Truss Pins, R-Clips, and any additional rigging accessories.

Prepare the Base Plate:

Position the Global Truss 30"x30" base plate on a level and stable surface in your desired location for the truss totem.


Place Global Truss Base Plate 30x30 on flat surface/ground


Assemble the Truss Segments:

Select suitable Global Truss F34 square box truss segments to achieve your desired height. Connect the segments using compatible connectors, ensuring each connection is secure and aligned.


Global Truss F34 Square Box Truss


Attach the Truss to the Base Plate:

Securely fasten the base plate to the bottom truss segment using F34 Truss Pins and R-Clips. Insert the Truss Pins through the pre-drilled holes in the truss and base plate, then secure them in place with R-Clips for a stable connection.


Connect Global Truss 30x30 Base Plate with F34 Square Box Truss


Attach the Top Plate:

If you're planning to mount moving head lighting fixtures, securely attach either an SQ-4137 Base Plate or a GT-MH Base Plate to the top truss segment. Use appropriate hardware provided by the manufacturer to ensure a stable connection.


Connect Global Truss Top Plate with F34 Square Box Truss


Rigging and Attachment:

Rig and attach lighting fixtures or equipment, including truss lighters, according to manufacturer recommendations. Distribute weight evenly to prevent overloading.

Test Stability and Balance:

Perform a stability test by gently applying pressure to different points of the truss totem, checking for wobbling or instability. Make adjustments as necessary to ensure stability.

Lift the Truss Totem:

With assistance, carefully raise the truss totem to its full height using appropriate safety measures such as harnesses or safety ropes.

Secure in Position:

Once in position, securely tighten clamps or bolts connecting the truss totem to the base plate, ensuring stability.

Final Checks and Adjustments:

Conduct a thorough inspection for loose connections or signs of instability, making necessary adjustments to ensure safety and security.

Conclusion:

Assembling a Global Truss F34 Square Box Truss Totem for stage lighting requires meticulous attention to detail. By following this step-by-step guide, you'll create a truss totem that not only enhances your stage setup's visual impact but also prioritizes safety, ensuring unforgettable experiences for your audience, whether you're an experienced event professional or new to stage design.

Read more →

Constructing a Dynamic Global Truss F34 10' X 10' Display Booth Truss System: A Step-by-Step Guide

Emmanuel Josue

Constructing a Dynamic Global Truss F34 10' x 10' Display Booth Truss System can be an engaging project that requires attention to detail and some basic understanding of structural assembly. Here's a step-by-step guide to help you build your display booth:

Step 1: Preparation

  • Materials Needed: Ensure you have all the necessary parts of the Global Truss F34 system, including truss sections, base plates, conical connectors, safety pins, and a hammer or mallet for securing the connections.
  • Safety Gear: Wear appropriate safety gear, including gloves and eye protection.
  • Space: Clear a large, flat area for assembly.

 Global Truss Stage Trussing materials needed for the project


Step 2: Layout

  • Lay out the truss pieces on the ground in the shape of your 10' x 10' booth. This typically involves four corner pieces, four straight pieces for the sides, and cross-pieces for added stability and support.

Step 3: Assemble Base

  • Start by attaching the base plates to the bottom of each corner piece. Ensure the base plates are securely fastened to provide a stable foundation.
  • Erect the corner pieces on their base plates in their approximate locations.

Connect SQ-4137 base plates with the 8.2ft long square box vertical trusses

Step 4: Connect Trusses

  • Begin connecting the straight truss sections to the corner pieces. The F34 system uses conical connectors that fit into the ends of the truss sections. Insert the connectors into one end, align the next truss section, and gently tap the pieces together with a mallet.
  • Secure each connection with the provided safety pins to ensure the structure is locked in place.

 Connect the SQ-4126 3-way Corner with 6.56ft long horizontal trusses and 8.2ft long vertical trusses


Step 5: Add Cross Supports

  • If your design includes cross supports for added stability or to hang displays, attach these now. Similar to the straight sections, use the conical connectors and safety pins to secure the cross-pieces in place.

Step 6: Raise Structure

  • With the help of at least one other person, carefully lift the structure into an upright position. Ensure all base plates are flat on the ground and the structure is stable.

Step 7: Final Adjustments

  • Walk around the structure to ensure all connections are secure and the booth is square and stable. Make any necessary adjustments.
  • Attach any additional elements such as lighting, banners, or displays to the truss system, following the manufacturer's recommendations for weight limits and securing methods.

Step 8: Safety Check

  • Perform a final safety check to ensure everything is secure. Check all connections, ensure the structure is stable, and confirm that all displays are safely attached.

Tips:

  • Always refer to the manufacturer's instructions for specific details regarding assembly and safety precautions.
  • If you're unfamiliar with truss systems or concerned about safety, consider hiring a professional to assist with the assembly.
  • Regular maintenance checks are important to ensure the long-term stability and safety of your truss system.

This guide provides a general overview, and it's crucial to adapt the steps as needed based on the specific design and components of your Global Truss F34 system. Stay safe and enjoy your new display booth!

Read more →

Elevating Entertainment: The Power of Stage Trussing by Global Truss & Famous Stages

Emmanuel Josue

Unveiling Stage Trussing

Stage trussing serves as the backbone of live events, offering structural support while facilitating the integration of lighting, audio, and visual elements. Global Truss, a leader in trussing innovation, delivers cutting-edge solutions renowned for their durability and versatility. At famousstages.com, customers gain access to a comprehensive selection of Global Truss products, tailored to meet the diverse demands of entertainment professionals.

Shaping the Entertainment Landscape

Global Truss and famousstages.com have made significant contributions to the entertainment industry, providing stage trussing solutions that have left an indelible mark on stages worldwide. Behind the scenes, their partnership ensures seamless performances, with Global Truss systems providing robust support for elaborate lighting rigs and audio equipment.

The Role of Lighting Trussing

Lighting trussing plays a crucial role in enhancing the visual experience of live performances, allowing lighting designers to craft immersive environments that captivate audiences. At famousstages.com, customers can explore a vast array of lighting trussing options, meticulously engineered to meet the demands of modern productions.

  • Versatility: Lighting trussing sourced from famousstages.com offers unparalleled flexibility, enabling designers to create custom configurations tailored to the unique requirements of each venue and performance.
  • Innovation: With Global Truss's commitment to innovation and famousstages.com's dedication to customer satisfaction, customers can expect cutting-edge solutions that push the boundaries of what's possible in live entertainment.

Partnering for Success

Beyond providing world-class products, famousstages.com goes the extra mile to support its customers, offering free stage trussing design services. With a team of experienced professionals, customers receive personalized assistance in creating bespoke trussing solutions that elevate their productions to new heights.

Conclusion

In the dynamic world of entertainment production, stage trussing serves as the cornerstone of unforgettable performances. Through the partnership between Global Truss and famousstages.com, entertainment professionals gain access to top-tier products and unrivaled support, ensuring that every production shines bright and leaves a lasting impression on audiences worldwide.

For more information on stage trussing solutions, visit famousstages.com and discover how the industry leaders can elevate your next event to new heights.

Read more →